Irrational Exuberance for 11/13/2019
Hi folks,
This is the weekly digest for my blog, Irrational Exuberance. Reach out with thoughts on Twitter at @lethain, or reply to this email.
Posts from this week:
-
Creating a Slack App in Python on GCP.
-
Adding App Home to Slack app in Python.
-
Make Slack app respond to reacji.
-
Using Cloud Firestore to power a Slack app.
-
Distributing your Slack application.
Creating a Slack App in Python on GCP.
Last week I chatted with someone working on an application to facilitate better 1:1s and skip-level 1:1s. What struck me most was the thought that it might be both faster and a better user experience convenient if this tool was implemented as a Slack application rather than a web application.
This left me with an interesting question: has the Slack ecosystem and toolchain reached a place where it's quicker and easier to use the Slack stack than the typical web stack?
With that in mind, I decided to spend some time experimenting with the Slack API and get a feel for its development experience and flexibility. To minimize balance infrastructure complexity with preserving a path to production, I decided to build this as a handful of serverless functions running on GCP's Cloud Functions.
These are my notes.
commit 5359 in lethain/reflect-slack-app contains this post's code
Slack app in Python series
- Creating a Slack App in Python on GCP
- Adding App Home to Slack app in Python
- Make Slack app respond to reacji
- Using Cloud Firestore to power a Slack app
- Distributing your Slack application
What to build?
For the last year or so I've been writing weekly updates at work to keep folks informed about my priorities and to make it easier to write what Julia Evans calls a brag document (a list of accomplishments you use to track your progress and write your self-review).
I'd been experimenting with a simple web application to handle this, but nothing
about this problem demands a web application. Indeed, it's not too hard to imagine
a simple implementation that boils down to two commands: /reflect and /recall.
/reflect lets folks record work:
/reflect finished writing reviews #reviews #mgmt
/reflect implemented prototype of load balancing tool #programming
/recall retrieves your reflections:
/recall #mgmt
/recall #programing
/recall last 7 days #mgmt
This is a simple interface, but should be enough.
Getting started
Apps need to be developed within a specific workspace, so I started out by creating a new Slack workspace, and then created a new Slack App named "Reflect."
Slack calls commands like /recall a Slash Command.
Each time you submit a Slash Command in your Slack console,
Slack processes the command and sends a POST request to an endpoint that you register to that command.
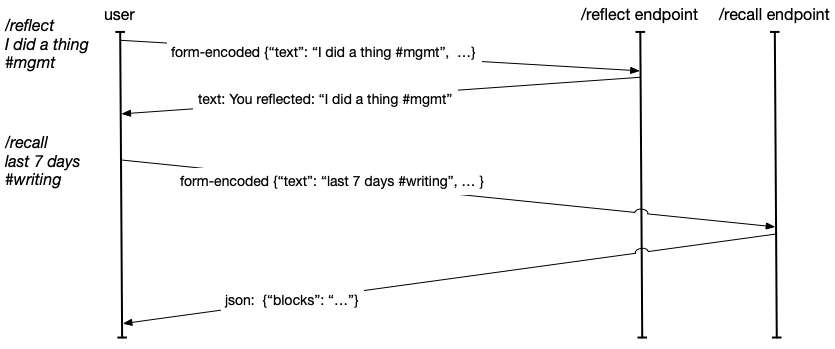
Your endpoint is able to return either text/plain with text to display in the user's console,
or you're able to send application/json to support more sophisticated rendering, which we'll
dig into more later.
To map a given command to the correct backend code, you're able to specify different endpoints
for each Slash Command. Alternatively, you're able to inspect
incoming requests from Slack for the command key-value pair and dispatch based on that value.
Configuring Cloud Functions
In order to register our Slash Commands,
one of the required fields
is Request URL, which is the HTTPS endpoint to receive POST requests each time the command is issued.
While Glitch is probably the easiest way to do this,
I wanted to simulate a slightly more production-like experience using Google Cloud Functions
to host the endpoints.
This began with creating the reflect-slack-app repository on Github and cloning it locally:
git clone git@github.com:lethain/reflect-slack-app.git
cd reflect-slack-app
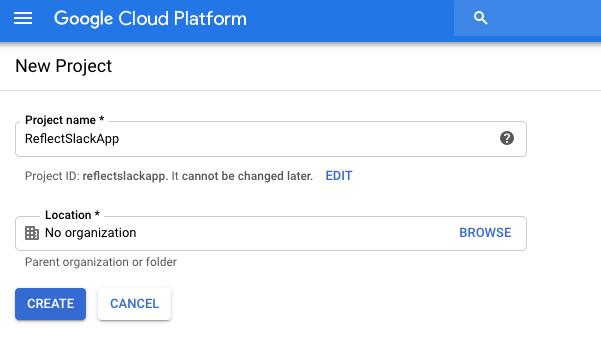
Then I followed these instructions to create a new GCP project named ReflectSlackApp.
Then I enabled the Cloud Functions API within that new project.
Aside: having to individually enable APIs is absolutely the worst part of onboarding developer experience for GCP. I'm certain there are good reasons around this pattern to avoid accidental billing, etc, but it seems like GCP would be much better off opting folks into everything combined with a default low per-feature budget cap. Which would, admittedly, require them to implement hard budget caps, which I believe they don't have yet, but I think it would be worth it in terms of increased onboarding velocity and reduced user abandonment.
Next it's time to scaffold reflect-slack-app/,
following the rough structure in this helloworld example.
python3 -m venv venv
source venv/bin/activate
mkdir reflect
emacs reflect/main.py
We'll start with the simplest possible Slash Command handler,
which will ignore the incoming message and return text/plain
with a static message. This won't do anything, but it will let
us confirm we've wired the connections up properly.
def reflect_post(request):
    return "Reflect!"
Before uploading the function I made sure to point my gcloud configuration to the new project
that I just created (ok, ok, I admit that I forgot to do this, but you can learn from my confusion):
gcloud projects list
PROJECT_ID              NAME                    PROJECT_NUMBER
...
reflectslackapp         ReflectSlackApp         0000000000000
...
gcloud config set project reflectslackapp
Then we're ready to deploy the function:
cd reflect-slack-app/reflect
gcloud functions deploy reflect_post –runtime python37 –trigger-http
The first time this ran, it asked me if I would allow unauthenticated invocations (where authentication here is Google ID token authentication), which you must accept if you want it to be reachable by Slack:
Allow unauthenticated invocations of new function [reflect_post]?
(y/N)?
y
After it was done, and it's curlable:
curl https://your-url-here.cloudfunctions.net/reflect_post
Reflect!
Awesome, so now we have an endpoint to point our new Slash Command towards, and we can go back to setting up the Slack App.
Should api platforms go into FaaS?
Before we go further, it's interesting to consider whether API platforms should even ask users to go through the steps of setting up a function-as-a-service environment or if they should just host functions for their users directly.
Google Functions, AWS Lambda and so on are fairly easy to setup at this point, but they still create significant onboarding friction for folks, which is why approaches like Twilio Functions have a huge place in easing onboarding.
Long-term, I believe few companies ought to make the infrastructure investments required to support production workloads – AWS and GCP are going to provide better integration with your overall workflow than Twilio or Slack can – but for early onboarding and experimentation the production quality bar is just friction.
I'd love to see a standardized pattern where platforms like Slack or Twilio are a launchpad for hosting simple integrations, and couple that approach with single-button export to AWS/Azure/GCP as a given users integration passes some particular bar for sophistication. This would make it quicker for new users to experiment on these platforms, which is mutually beneficial for both the platforms and the users, without inflicting the full production quality friction on the users or the api platforms.
Perhaps even more important is a hidden benefit to the API platforms themselves: hosting the long tail of integrations gives you access and control over those integrations' implementation. With access to these integrations, you can programmatically refactor them, for example automatically upgrading them off deprecated functionality even if they're absentee maintainers. This is surprisingly valuable because slow deprecation in the long-tail is one of the core constraints for successful api platforms.
Register /reflect
With our endpoints provisioned,
our next step is registering the Slash Command for /reflect,
which we'll do within the Slack app dashboard.
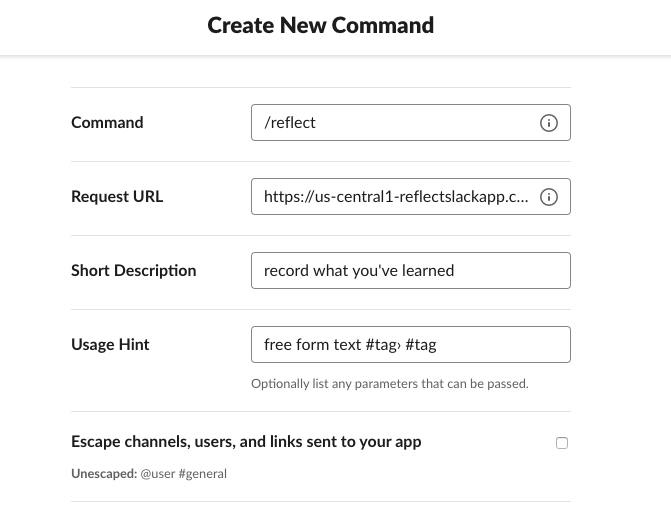
This requires specifying the Command, Request URL, Short Description and Usage Hint.
Of those, the two most important are the command, which in this case should be /reflect
and the request url which will have been spit out by the gcloud CLI when you registered
the function, something along the lines of:
https://your-url-here.cloudfunctions.net/reflect_post
With that registered, we're half way to a working application.
Add /recall
Now that we have /reflect implemented, we also need to add the /recall command,
first adding another endpoint to support it, and then registering it in our Slack app:
Adding the endpoint:
mkdir reflect
emacs reflect/main.py
Then we add the simplest implementation of recall_post:
def recall_post(request):
    return "Recall!"
And to upload the implementation:
cd reflect-slack-app/reflect
gcloud functions deploy recall_post –runtime python37 –trigger-http
Finally, register it for your Slack App using your new request url returned when you created this function.
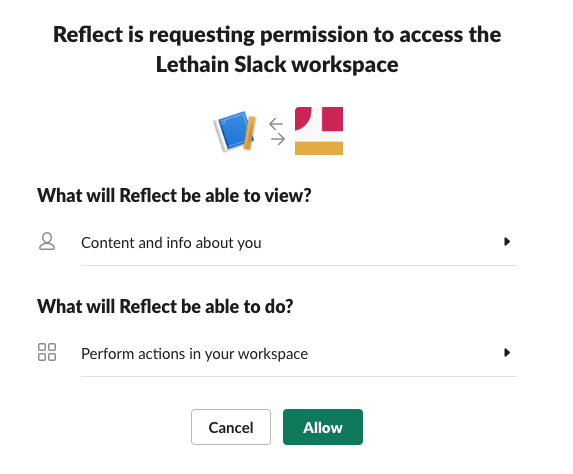
Install app into workspace
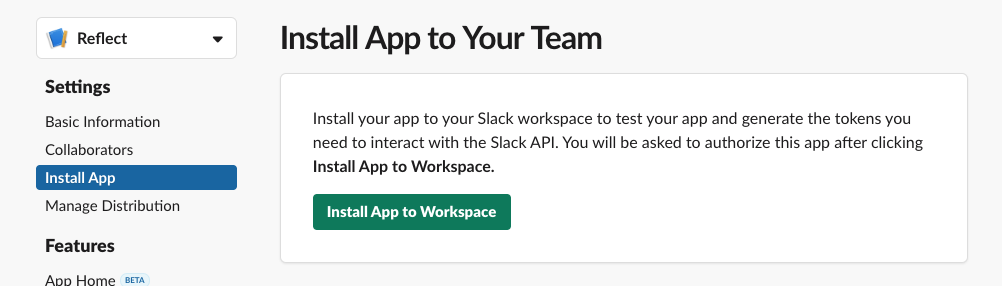
Next you'll need to go to "Install App" in the left nav bar and click "Install App to Workspace" to add the application to your workspace to use it. This will ask you to approve some permissions.
Now it's installed, and we can verify by connecting to the linked workspace and trying the commands.
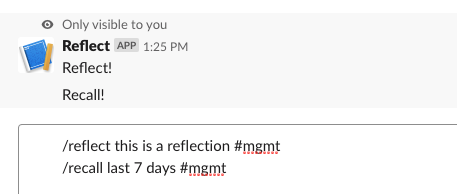
They work! They don't do much yet, but we've verified the connections and we can start on the actual implementation.
Development loop
This also demonstrates the development feedback loop for iterating on these commands: change the code, deploy the updated function, try the command and see the response.
When things didn't work out, I found debugging to be pretty straightforward relying on Google's Stackdriver for error messages. I do wish that Slack would track my last couple hundred error messages and show them in a dashboard to faciltiate easier debugging, but this worked well enough using server-side visibility.
Google's tutorials could also expose a faster development loop: there's no reason why the examples
couldn't have a simple __main__ implementation that exposes your endpoints locally
for quick testing. Admittedly it would be quite easy to unittest
these very simple functions and run them before deployment.
Formatting the responses
With the scaffolding set up, now we can work on formatting our response into something useful. Slack messages are composed of formatting blocks, which you can experiment with quickly using the Block Kit Builder.
We want our endpoints to return JSON structured along the lines of:
{
  "blocks": [{}, {}, {}],
}
There are quite a few kinds of blocks, but we'll rely on section and divider
for our initial rendering. Dividers are essentially a horizontal rule, e.g. hr, tag, and are quite simple:
{
  "type": "divider"
}
Sections are able to render a subset of Markdown which Slack calls mrkdwn,
and look like:
{
  "type": "section",
  "text": {
    "type": "mrkdwn",
    "text": "This is *sort of* Markdown"
  }
}
A lot of the Markdown syntax you love won't work, the details are documented in the mrkdwn docs.
Putting all of this together, a full response would look like:
{
  "blocks": [
    {
      "type": "section",
      "text": {
        "type": "mrkdwn",
        "text": "This is *sort of* Markdown"
      }
    },
    {
      "type": "divider"
    }
  ]
}
Now we need to update our Flask response format to follow that structure. A quick reminder, full code is on Github, no need to reconstruct it from these exerpts.
We're not storing the messages sent to us via /reflect yet, so for now we'll
randomly generate fake messages for rendering:
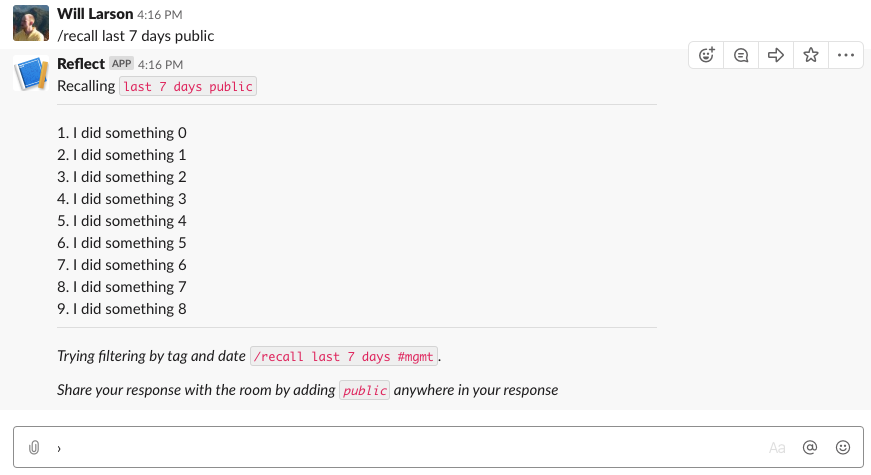
def recall(team_id, user_id, text):
    "Recall for (`team_id`, `user_id`) filtered by parameters in `text`"
    import random
    return ["I did something {}".format(x)
            for x in range(random.randint(3, 10))]
Which will return a list containing a variable number of strings:
[
  "I did something 0"
  "I did something 1"
  "I did something 2"
]
We'll use that function in our updated recall_post function:
def recall_post(request):
    data = request.form
    team_id, user_id, text = data['team_id'], data['user_id'], data['text']
    items = recall(team_id, user_id, text)
    items_text = "\n".join(["%s. %s" % (i, x)
                  for i, x in enumerate(items, 1)])

    block_args = [
        ('mrkdwn', "Recalling `{}`".format(text)),
        ('divider',),
        ('mrkdwn', items_text),
        ('divider',),
        ('mrkdwn', "_Trying filtering_ `/recall last 7 days #mgmt`."),
        ('mrkdwn', "_Share your response by adding_ `public`"),
    ]

    resp = {
       "text": items_text,
       "blocks": [block(*args) for args in block_args]
    }
    return jsonify(resp)
The block function is a helper that translates tuples of type and optionally text
into sections, for example:
>>> block(tuple('divider'))
{
    "type": "divider"
}
And is implemented as:
def block(typ, text=None):
    if typ == "mrkdwn":
        return {
            "type": "section",
            "text": {
                "text": text,
                "type": "mrkdwn"
            }
        }
    else:
        return {
            "type": typ
        }
Now when we use /reflect the response is well formated:
This would certainly look better with real response data, but we can see the pieces coming together for how the application would work, and we've written staggeringly little boilerplate code (text user interfaces ftw).
Public versus ephemeral
You can control whether your responses are sent to the channel or privately
to the individual by using the response_type
field in your response. The default is to only show responses to the user issuing the
command, which is equivalent to setting the response type to ephemeral:
{
  ...
  "response_type": "ephemeral",
  ...
}
Alternatively, we could show everyone in the channel:
{
  ...
  "response_type": "in_channel",
  ...
}
Experimenting with things a bit, I decided to let the user control where it goes by
adding the public parameter anywhere in the message text when they /recall, for example:
/recall last 7 days #mgmt public
Would go to the room instead of just private. This was shoddily implemented as a one-line
extension to recall_post above:
resp = {
    "text": items_text,
    "response_type": "in_channel" if "public" in text else "ephemeral",
    "blocks": [block(*args) for args in block_args]
}
In a real implementation you would, certainly, want to actually tokenize the contents
to avoid the tag #public in the text flipping the public flag, etc.
Discoverability
I think experimenting with ideas like this public flag are important
to successful Slack applications, because
my experience working with Slack as a medium, is that one of the biggest challenges for Slash Commands
is discoverability. Command discoverability has long plagued other text-only mediums like IRC.
The only text-based medium that I've used that handled command discovery particularly well are multi-user dungeons,
which expose a command along the lines of commands that give a full list of available actions,
and reward folks for learning them through enhanced gameplay.
(I believe Slack used to support /commands but have removed it, I imagine working around
some kind of implementation constraint.)
Consequently, in tools like Stripe's internal incident communication Slack app, we've
come to prioritize creating command discoverability in any text returned to the channel,
as well as hinting at other commands whenever a user uses a command. An example of both is when you use
the public flag in recall, your response informs others of how to use the command:
Try filtering by tag and date `/recall last 7 days #mgmt`
Share with the room by adding `public` anywhere in your response
You could imagine a learning version of this approach which tracks the number of times you've used the command and returns fewer and fewer hints over time. Or perhaps starts adding hints over time once you've gotten comfortable with the fundamentals.
Verifying requests
As the very last step before calling this prototype complete, I want to implementation request verification to ensure that we're only handling requests from Slack itself. If we don't add verification, folks can just spoof traffic to your endpoints, which would be pretty unfortunate.
I wrote up details of generating the signature in this post, so I'll
show the verify function without explanation. verify should be the first
step in each of your Slash Command handlers.
def verify(request,secret):
    body = request.get_data()
    timestamp = request.headers['X-Slack-Request-Timestamp']
    sig_basestring = 'v0:%s:%s' % (timestamp, body.decode('utf-8'))
    computed_sha = hmac.new(secret,
                            sig_basestring.encode('utf-8'),
                            digestmod=hashlib.sha256).hexdigest()
    my_sig = 'v0=%s' % (computed_sha,)
    slack_sig = request.headers['X-Slack-Signature']
    if my_sig != slack_sig:
        err_str = "my_sig %s does not equal slack_sig %s" % \
                   (my_sig, slack_sig))
        raise Exception(err_str)

def recall_post(request):
    signing_secret = b'your secret from some config tool'
    verify(request, signing_secret)
    return "Signatures match, yay."
The question then is how should we actually store our signing secret so that it can be pulled into our Cloud Function while avoiding committing it into the git repository which I hope to store publicly on Github.
The easiest way to handle this is adding the secret to an environment variable,
using the –env-vars-file flag to specify a file including your secret.
We'll create reflect/env.yaml which is
SLACK_SIGN_SECRET: your-secret-goes-here
Then update recall_post to read the secret from the env.
def recall_post(request):
    signing_secret = os.environ['SLACK_SIGN_SECRET'].encode('utf-8')
    verify(request, signing_secret)
Now when we deploy the function we need to run:
cd reflect
gcloud functions deploy \
recall_post –env-vars-file env.yaml \
–runtime python37 –trigger-http
Note that you only really need the last two parameters the first time you deploy a function, but they're harmless to specify later, so feel free to keep or omit depending on what you're doing.
The approach described in this blog post to store your secrets in Google Cloud Key Management Service is much better from a security perspective. If you're building something good, you should probably do that rather than stuff the secret into the environment.
Ending thoughts
Having gotten this far, what's most top of mind for me is all the other things I'd like to do next to make this a complete, functional application. The top four being:
- Adding a App Home which would show you your reflections from the last few weeks and potentially support some degree of in-line sorting and filtering.
- Use the Events API to let folks tag messages for later recall. Maybe even let you tag someone else's message for their recall, letting teams show support for each others work.
- Maybe, ya know, add a database to track stuff instead of randomly generating data.
- Distributing Reflect into the application directory so folks could use it.
Hopefully I'll get around to working through and writing up those parts as well in the next few weeks. Either way, super impressed with the experiences that the Slack ecosystem facilitates, and excited to play around with it more.
series continues in Adding App Home to Slack app in Python
Adding App Home to Slack app in Python.
Building on Creating a Slack App in Python on GCP, I wanted to continue extending reflect-slack-app to include an App Home.
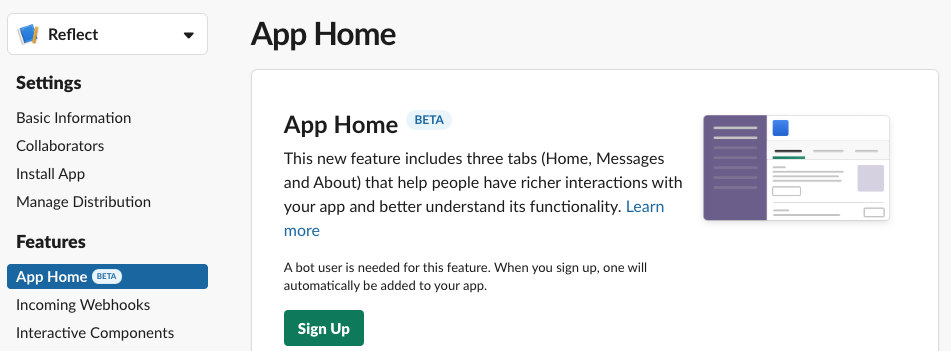
The App Home screen allows each user in a workspace to have a personalized view powered by the app, which the app can use to share whatever data or interactions (buttons, etc) they want. Want to let folks configure their settings for your app? You can! Want to let folks see their most recent activity? You can! Want to let users know the current status on all open projects? You can!
The functionality is in Beta and before I started playing around with the api, I hadn't actually realized this functionaltiy existed, although I'd been wanting it to exist. For me, the application home concept is particularly interesting because it's a great mechanism to (a) summarize information for users, and (b) improve discoverability of app functionality.
It also represents a meaningful step from chatbot and Slash Command driven interactions to a richer, more web-like experience. Alright, onward into the integration.
post starts at commit 5359, and ends at commit 4120
Slack app in Python series
- Creating a Slack App in Python on GCP
- Adding App Home to Slack app in Python
- Make Slack app respond to reacji
- Using Cloud Firestore to power a Slack app
- Distributing your Slack application
Sign up for App Home
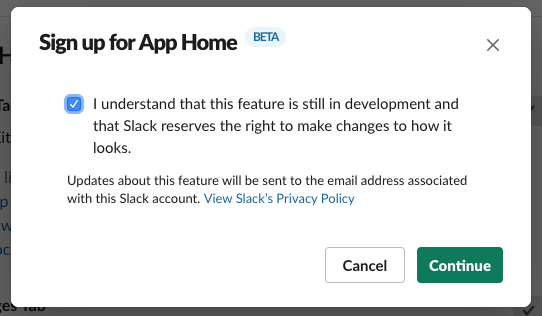
The first step is signing up the App Home functionality in your App dashboard.
Because this functionality is still in Beta, there is a disclaimer warning you that it might change. Accept it you must.
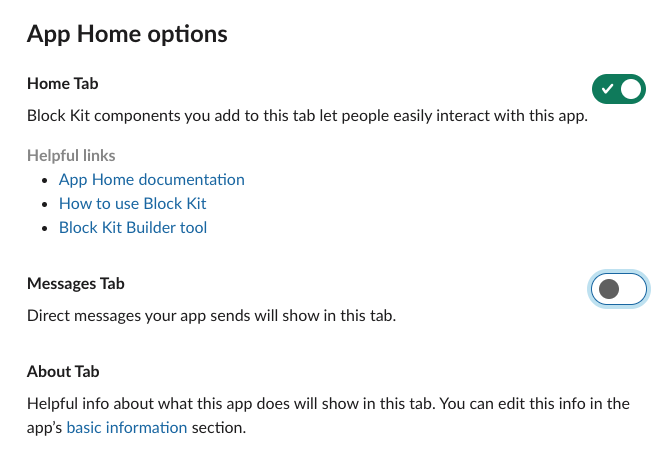
App Home requires a bot user, but we're not going to be using the bot user for any chatbot functionality
and neither will we expect users to send messages to the bot (they'll keep using the /reflect and /recall
Slash Commands instead),
so go ahead and disable the "Messages Tab" to avoid confusion.
Now that we've setup an App Home, how do we actually render it?
Register for app_home_opened
We need register for the app_home_opened event
from the Events API.
That means we need to integrate with the Event APIs before going any further.
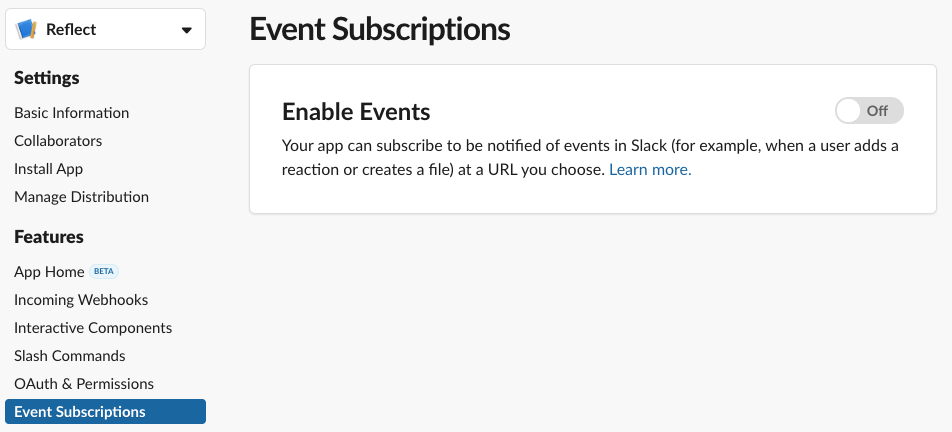
The first step is enabling Events API in your App dashboard.
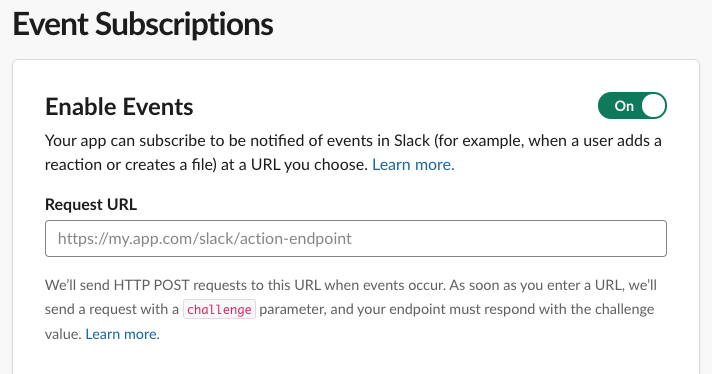
Once the Events API is enabled, the next step is setting up a Request URL.
That in turn requires setting up a handler for the url_verification event.
When we add our URL, they'll send over a message encoded in application/json (unlike the Slash Commands, which are application/x-www-form-urlencoded).
{
  "token": "random token",
  "challenge": "challenge to return",
  "type": "url_verification"
}
Within that message is a challenge key-value pair, and we want to
return that value within a JSON message.
{
  "challenge": "challenge to return"
}
Kicking off our integration,
it's time to pop over to the lethain/reflect-slack-app repository,
starting from commit 3aa6, and
opening up reflect/main.py to add a new function:
def event_post(request):
    signing_secret = os.environ['SLACK_SIGN_SECRET'].encode('utf-8')
    verify(request, signing_secret)

    parsed = request.json
    challenge = parsed['challenge']
    return jsonify({"challenge": challenge})
Notice that we're using verify to verify the request's authenticity.
Verifying request signatures is the "modern" way to verify messages from Slack. There is
another older method using the token parameter sent by url_verification. Using that deprecated approach, you'd capture
the supplied token (random token in the above example) and
verify all subsequent requests include that token.
Since we're verifying request signatures, it's safe to ignore the token.
Now we need to create a new Cloud Function serving the event_post
function.
> gcloud functions deploy event_post \
–env-vars-file env.yaml \
 –runtime python37 \
–trigger-http

Allow unauthenticated invocations of new function [event_post]? (y/N)?
> y
Deploying function (may take a while - up to 2 minutes)...
This will return a URL along the lines of:
https://your-app-here.cloudfunctions.net/event_post
Which we add to Events Subscriptions tab in the App dashboard.

When you paste in your URL, Slack will automatically verify it and either display "Verified" above or show some super helpful debugging information below, including your endpoint's unexpected response.
Once your URL is verified, open up Subscribe to bot events and subscribe to the app_home_opened
event.
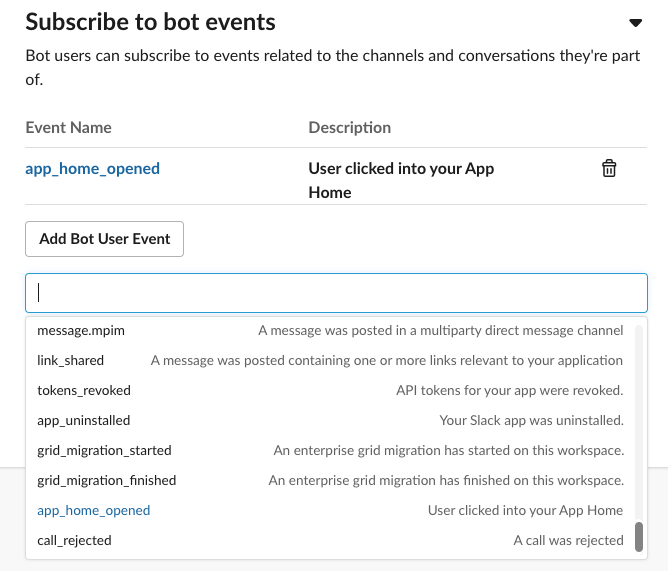
Finally, you must click Save Changes at the bottom. It's a bit easy to miss, but you'll have to redo these steps if you accidentally close the tab without saving.
Reinstall app

Now that we've enabled the App Home and Event Subscriptions, we need to reinstall our application to request these additional permissions.
And now something amazing has happened, your application's App Home is available now if you go back to the workspace where it's installed and search for the application's name.
So click on it and let's get started.
Routing events from Events API
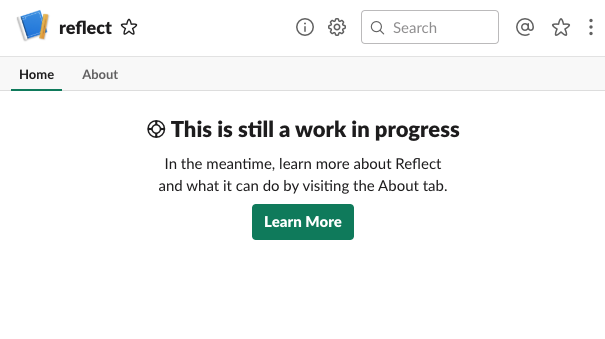
The first time you load your App Home is a bit sad, showing a "work in progress" screen. We're going to fix that, eventually, but it's going to require a few steps.
First we need to handle the app_home_opened event that is sent each time
a user visits their App Home for your application.
The Events API has two layers of event types, so the requests
that event_post will receive are structured like this:
{
  "type": "event_callback",
  "event": {
    "type": "app_home_opened",
    "other": "stuff"
  },
  "other": "stuff"
}
Knowing the format, we can refactor event_post a bit to split up handling different
message types and event types.
def event_post(request):
    signing_secret = os.environ['SLACK_SIGN_SECRET'].encode('utf-8')
    verify(request, signing_secret)
    parsed = request.json
    event_type = parsed['type']
    if event_type == 'url_verification':
        return url_verification_event(request, parsed)
    if event_type == 'event_callback':
        return event_callback_event(request, parsed)
    else:
        raise Exception("unable to handle event type: %s" % (event_type,))

def url_verification_event(request, parsed):
    challenge = parsed['challenge']
    return jsonify({"challenge": challenge})

def event_callback_event(request, parsed):
    event_type = parsed['event']['type']
    if event_type == 'app_home_opened':
        return app_home_opened_event(request, parsed)
    else:
        raise Exception("unable to handle event_callback event type: %s" \
                        % (event_type,))

def app_home_opened_event(request, parsed):
    print(parsed)
    return "to be implemented"
If we deploy this updated version and tab away from and back to our App Home,
then our logs include a complete event message for app_home_opened:
{
  'token': 'token-token-token',
  'team_id': 'tttttttttt',
  'api_app_id': 'aaaaaaaa',
  'event': {
    'type': 'app_home_opened',
    'user': 'uuuuuuuuuu',
    'channel': 'ccccccccc',
    'tab': 'home'
  },
  'type': 'event_callback',
  'event_id': 'eeeeeeeeee',
  'event_time': 1500000000
}
Now, you might dream that we just need to update our app_home_opened_event function
to return some Block Kit elements to have them render,
but it's not quite that simple. Instead our handler will need to integrate with
one of the Slack Web APIs, views.publish.
Calling Web APIs
Slack's Web API is a pretty typical HTTP API.
In our case, we need to send a POST request to views.publish at
https://slack.com/api/views.publish
We'll be sending application/json request bodies which look like:
{
  "user_id": "uuuuuuuuuuu",
  "view": {
    "type": "home",
    "blocks": [
      {
        "type": "section",
        "text": {
          "type": "mrkdwn",
          "text": "To be implemented"
        }
      }
    ]
  }
}
Each of those blocks conforms to the format we previously used to render responses to Slash Commands.
We'll also need to include our bot's token, which you can find in the OAuth & Permissions tab of your app dashboard, as an HTTP header:
Authorization: Bearer xoxp-xxxxxxxxx-xxxx
We'll start by extending reflect/env.yaml to include that token:
SLACK_SIGN_SECRET: your-signing-secret-here
SLACK_BOT_TOKEN: your-bot-token
We're going to send requests to Slack's APIs using
Python's requests library.
The first step towards that enviable goal is adding requests/requirements.txt to our repo so Cloud Functions
is aware of our dependency:
requests==2.20.0
We'll also want to install that locally for any local validation we do into the virtual environment we created last time:
source ../venv/bin/activate
pip install requests==2.20.0
Then we can write a utility in reflect/main.py to
perform requests:
import requests

def slack_api(endpoint, msg):
    url = "https://slack.com/api/%s" % (endpoint,)
    bot_token = os.environ['SLACK_BOT_TOKEN'].encode('utf-8')
    headers = {
        "Authorization": "Bearer %s" % (bot_token.decode('utf-8'),),
        "Content-Type": "application/json; charset=utf-8",
    }
    resp = requests.post(url, json=msg, headers=headers)
    if resp.status_code != 200:
        raise Exception("Error calling slack api (%s): %s" % \
                        (resp.status_code, resp.content))
    return resp.json()
There are a few details within slack_api worth mentioning.
First, we're setting the Authorization header to verify our identy,
and requests will fail if it's not properly set.
Second, the Slack API considers it a warning if you don't specify character set,
so we're ensuring that Content-Type specifies one.
Rendering our App Home
Now that we have this utility, we'll call it along the lines of:
msg = {'some':' stuff'}
slack_api("views.publish", msg)
We can finally do something useful when we receive the
app_home_opened event and have it render roughly the same
content as we return through the /reflect Slash Command:
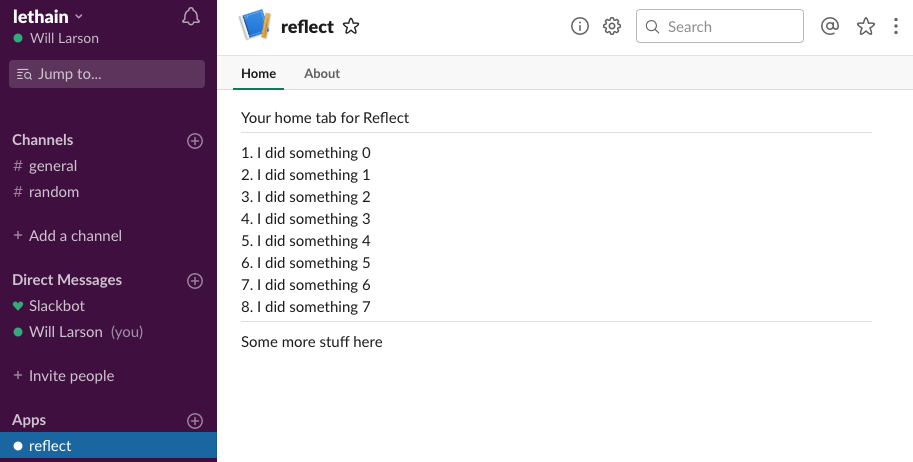
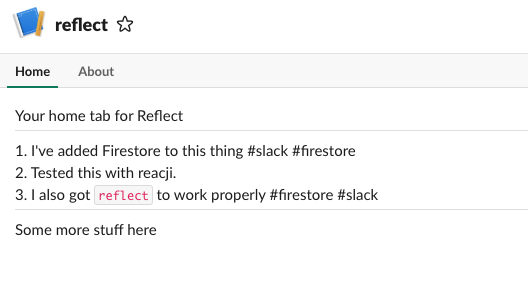
def app_home_opened_event(request, parsed):
    user_id = parsed['event']['user']
    team_id = parsed['team_id']
    items = recall(team_id, user_id, "last 14 days")
    items_text = "\n".join(["%s. %s" % (i, x) \
                            for i, x in enumerate(items, 1)])
    blocks_spec = [
        ('mrkdwn', "Your home tab for Reflect"),
        ('divider',),
        ('mrkdwn', items_text),
        ('divider',),
        ('mrkdwn', "Some more stuff here"),
    ]
    blocks = [block(*x) for x in blocks_spec]
    msg = {
        "user_id": user_id,
        "view": {
            "type": "home",
            "blocks": blocks,
        }
    }
    resp = slack_api("views.publish", msg)
    return "OK"
If we deploy that updated code and then reload our App Home tab, then something pretty great happens...

...it actually works!
Making App Home useful
What we've done here is quite basic, but you could imagine going much further with the concept.
This could be used to configure defaults how many days of results are returned by /recall,
it could be used to create an export-to-email widget, it could show the number of tasks you've
recorded for the trailing three months, etc.
You could even imagine it injecting a personalized image with a histogram of your projects by tag or some such, although I'm not quite sure what the authorization story would be for loading user-specific generated images, and looking at the image block spec I suspect there isn't one quite yet.
In the context of the toy Reflect application, I suspect the most important functionality would be showing a summary of recently added tasks and examples of how to use the various Slash Commands to aid with discoverability.
Next
The goals carried over from the first post on this project were (1) getting the App Home set up, (2) letting users add accomplishments via reacji, (3) integrating an actual database, and (4) publishing into the application directory.
As we reach commit 4120 in lethain/reflect-slack-app, we have a simple but functional App Home, letting us scratch one more item off that list. We've also integrated the Events API, so I suspect the reacji integration will be pretty straightforward, which is what we'll do next.
series continues in Have Slack app respond to reacji
Make Slack app respond to reacji.
This post continues the series on creating a Slack app in Python, picking up after adding an App Home view. A lot of the subtle, emergent communication patterns within Slack happen by reacting to messages with emoji, and I thought it would be fun to take advantage of that playfulness within the app we're building.
post starts at commit 4120, and ends at commit 08eb
Slack app in Python series
- Creating a Slack App in Python on GCP
- Adding App Home to Slack app in Python
- Make Slack app respond to reacji
- Using Cloud Firestore to power a Slack app
- Distributing your Slack application
Reacji and custom emoji
Slack's emoji reactions or reacji are a common way for folks to interact with messages in a channel.
For the application we're building, I was thinking it might be neat to add :ididit: and
:udidit: emoji, which folks could use to add items they did to their list of accomplishments
as well as use to add accomplishments to other folks' lists.
I've noticed some folks discount or dislike tracking their own accomplishments,
so this could be a playful way to get their team and community to help.
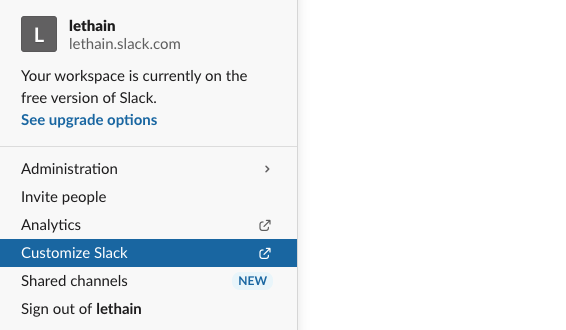
Add those emoji via the Customize Slack option in the top-left menu within your Slack workspace.
From there click on Add custom emoji and create an image somehow. I used Omnigraffle because I already had it open, but yeah, probably you'll use something else.
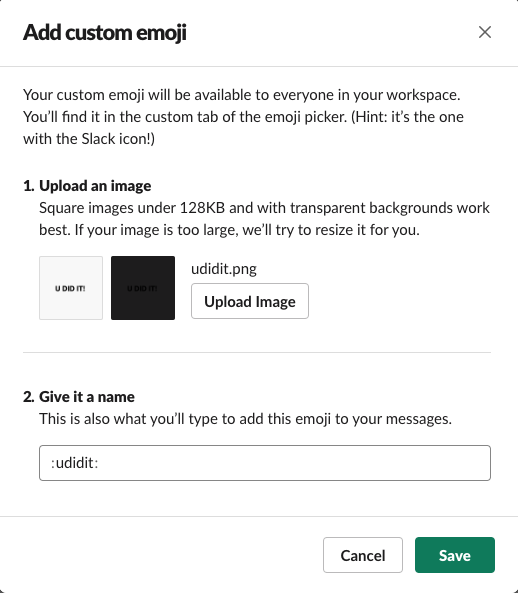
Add your image, name it :udidit: and click Save.
Then go ahead and do the same for the :ididit: emoji as well.
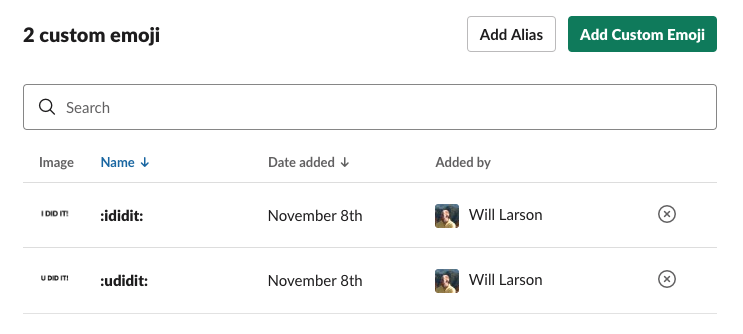
Now we have our custom emoji, and we just need to figure out how to get notified when they're used.
Subscribing to reaction_added events
Whenever an emoji is added, an associated reaction_added
event can be fired to the Events API, if you've subscribed to it.
To subscribe, head over to Event Subscriptions in your App dashboard, open up Subscribe to workspace events and select reaction_added.
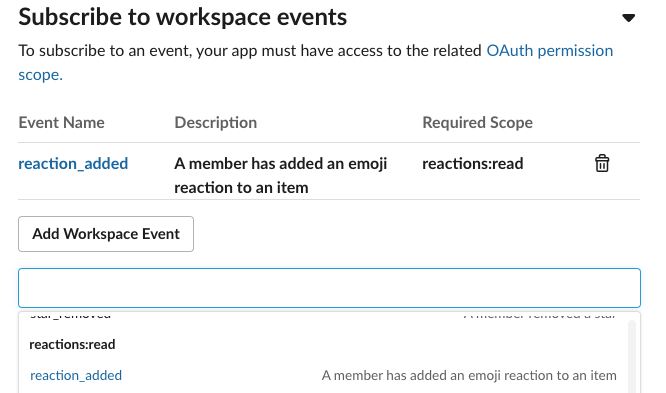
Remember to click Save Changes below, and reinstall your application with those additional permissions.
Handling reaction_added events
Now that we're receiving these events, we need to extend event_callback_event
to handle reaction_added events rather than erroring on them.
def event_callback_event(request, parsed):
    event_type = parsed['event']['type']
    if event_type == 'app_home_opened':
        return app_home_opened_event(request, parsed)
    elif event_type == 'reaction_added':
        return reaction_added_event(request, parsed)
    else:
        raise Exception("unable to handle event_callback event type: %s" % \
                        (event_type,))
For our first implementation of reaction_added_event, let's just
log the incoming message so we can get a look at its parameters.
def reaction_added_event(request, parsed):
    print(parsed)
    return "Ok"
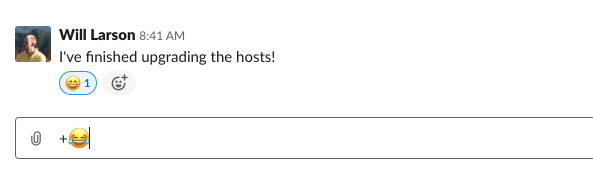
I added :relaxed: to a message and the handler emitted this
message from Slack.
{
  'token': 'ttttttttttttt',
  'team_id': 'tiiiiiiiiiiii',
  'api_app_id': 'aaaaaaaa',
  'event': {
    'type': 'reaction_added',
    'user': 'uuuuuuuuu',
    'item': {
      'type': 'message',
      'channel': 'ccccccccc',
      'ts': '1573231294.000900'
    },
    'reaction': 'relaxed',
    'item_user': 'iuuuuuuuu',
    'event_ts': '1573250406.000200'
  },
  'type': 'event_callback',
  'event_id': 'eeeeeeeee',
  'event_time': 1573250406,
  'authed_users': ['uuuuuuuuuu']
}
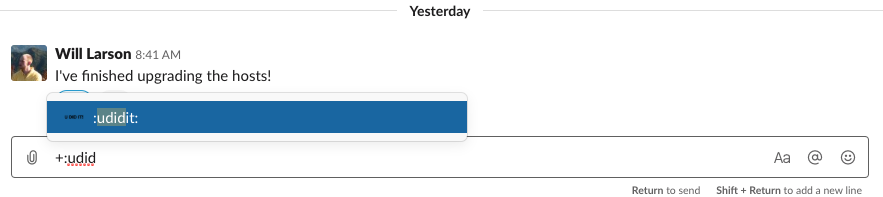
The first thing we want to do is to filter down to reactions
we're interested in.
We only want to
act on the two reactions we added, :ididit: and :udidit:,
and we only want to handle reactions to message items,
ignoring files and what not.
def reaction_added_event(request, parsed):
    event = parsed['event']
    if event['reaction'] in ('ididit', 'udidit'):
        if event['item']['type'] == 'message':
            print(parsed)
            print("yes, handling this message")

    return "Ok"
Now that we've filtered down to appropriate messages,
we're still not really sure about the contents of the message:
what did you or they actually do? To answer that, we'll
need to make a call to conversations.history
as described in the Retrieving messages docs.
Adding channels:history scope
Before we can call the channels.history endpoint, we first need to request
the channels:history OAuth scope.
Go into your app dashboard, click on OAuth & Permissions, scroll down
until you see Scopes and then add channels:history.
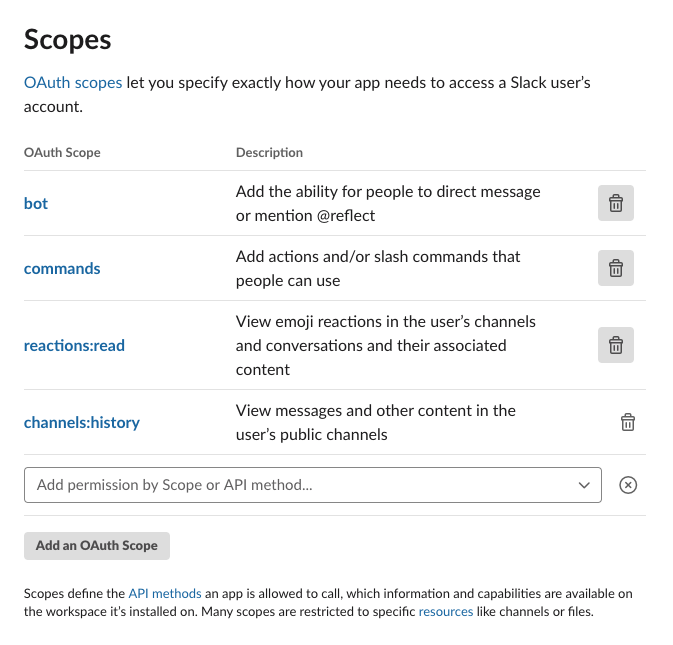
After that, reinstall your app to request the additional OAuth scope.
We've been using the bot token so far, not the OAuth token, so we'll
also need to the OAuth token to our env.yaml file. Your OAuth token
is in your App admin under OAuth & Permissions in the field labeled OAuth Access Token.
SLACK_SIGN_SECRET: your-secret
SLACK_BOT_TOKEN: your-bot-token
SLACK_OAUTH_TOKEN: your-oauth-token
With that set, we can take advantage of our new scope.
Calling channels.history
We previously implemented the slack_api utility function to
simplify calling the Slack API, but it turns out that we can't reuse
it easily for two reasons. First, conversations.history wants
application/x-www-form-urlencoded requests whereas the other endpoint
accepted application/json. Second, this endpoint wants a GET instead of
a POST, although that's fixed easily enough by using the requests.requests function
which accepts the HTTP method as a string.
To work around those constraints quickly, we'll write a get_message function which will call
into the API directly, instead of building on slack_api,
even though that's a bit on the sad side.
def get_message(channel, msg_ts):
    url = "https://slack.com/api/conversations.history"
    bot_token = os.environ['SLACK_OAUTH_TOKEN'].encode('utf-8')
    params = {
        'token': bot_token,
        'channel': channel,
        'latest': msg_ts,
        'limit': 1,
        'inclusive': True
    }
    resp = requests.get(url, params=params)
    return resp.json()
Then we'll update reaction_added_event to use this new function.
def reaction_added_event(request, parsed):
    print(parsed)
    event = parsed['event']
    if event['reaction'] in ('ididit', 'udidit'):
        item = event['item']
        if item['type'] == 'message':
            print("yes, handling this message")
            channel = item['channel']
            msg_ts = item['ts']
            msg = get_message(channel, msg_ts)
            print(msg)
    return "Ok"
Deploy the event_post function, add :ididit: to a message,
and we can get a look at the response format for conversations.history.
{
  'ok': True,
  'latest': '1573231294.000900',
  'messages': [
    {
      'client_msg_id': 'cmiiiiiiiiiiiiiiiii',
      'type': 'message',
      'text': "I've finished upgrading the hosts!",
      'user': 'uuuuuuu',
      'ts': '1573231294.000900',
      'team': 'ttttttttt',
      'blocks': ["a lot of stuff omitted"],
      'reactions': [
        {
          'name': 'ididit',
          'users': ['uuuuuuu'],
          'count': 1
        }
      ]
    }
  ]
What we really care about are messages/0/user and messages/0/text, which
we'll be able to use to add this message either to the speaking or emojing
user depending on whether it's an :ididthis: or udidthis respectively.
Pulling all together
Somewhat conspicuously, we still don't have a database to store
all of this, and we'll solve that in the next post, not this one. For now
we'll create an interface for storing this data, the reflect function.
def reflect(team_id, user_id, text):
    print("Reflected(%s, %s): %s" % (team_id, user_id, text))
Then we'll update reaction_added_event to call that function.
def reaction_added_event(request, parsed):
    event = parsed['event']
    if event['reaction'] in ('ididit', 'udidit'):
        item = event['item']
        event_user_id = event['user']
        if item['type'] == 'message':
            channel = item['channel']
            msg_ts = item['ts']
            msg_resp = get_message(channel, msg_ts)
            msg = msg_resp['messages'][0]
            msg_team_id, msg_user_id, text  = \
              msg['team'], msg['user'], msg['text']
            if event['reaction'] == 'ididit':
                reflect(msg_team_id, msg_user_id, text)
            elif event['reaction'] == 'udidit':
                reflect(msg_team_id, event_user_id, text)
    return "Ok"
Deploy again, and we've integrated reacji!
Reacji as interface
When I first started using Slack, I assumed reacji were a gimmick,
but then I remember the lightbuld going off when I first saw folks
organically start voting on a message using the :plus: emoji.
No one had asked them to vote, it just started happening, and it's
that organic freedom, constrained with the rigid constraints (they are just small images
with a count next to them) that lead to so the novel usage patterns.
No Slack App ever needs to integrate with reacji, but I've seen a bunch of creative integrations that acknowledge the patterns that folks already have and then enhance those patterns with automated action.
Another great aspect of reacji as user interface is they are more discoverable than Slash Commands, which are usually hidden from other users. Organic growth and adoption are underpinning of a successful app, and reacji are a powerful mechanism to that end.
Integration friction
I'll say that I was a bit surprised at how long it took me to get reacji working, because I'd come into this post assuming I was already done with most of the necessary work and would just be introducing a new event.
Instead I needed to add a new style of API integration since conversations.history
didn't support the JSON format, and a new API token since previously I'd been using the bot
token rather than the user token.
Individually, each of the Slack APIs are extremely well designed, it's only
collectively that they start to surface some degree of friction.
This is a common challenge for broad, sophisticated APIs. I'm currently reading Building Evolutionary Architectures, which is better, more structured coverage of the ideas I wrote about in Reclaim unreasonable software. API deterioration can be prevented, but requires very deliberate usage of "asserted properties" in my post's nomenclature or "fitness functions" in Ford/Parsons/Kua's.
Next
We've now reached commit 08eb, and are down to two more goals: integrating a database, and publishing this into the applications directory. I'll work on the database next, as it's hard to publish an app that is exclusively stub data, and then we can complete the publishing step.
series continues in Using Cloud Firestore to power a Slack app
Using Cloud Firestore to power a Slack app.
Continuing from Make Slack app respond to reacji, it's time to actually store and retrieve real data instead of relying on stubbed data. We'll be building on Google Cloud Firestore, which is a NoSQL database offered on GCP.
By the end of this post our /reflect commands and :ididit: reacji will get recorded properly,
and each call to /recall and visit to the App Home view will return real
data as well.
post starts at commit 08eb and ends at commit 4584
Slack app in Python series
- Creating a Slack App in Python on GCP
- Adding App Home to Slack app in Python
- Make Slack app respond to reacji
- Using Cloud Firestore to power a Slack app
- Distributing your Slack application
Breaking apart files
Before jumping into integration with Cloud Firestore, I did a good bit of repository clean up to prepare for those changes.
I broke apart reflect/main.py into a bunch of smaller,
more focused files.
I moved utility methods into reflect/utils.py
and Slack API integration into reflect/api.py.
I moved endpoints handling events into reflect/events.py
and those handling Slash Commands into reflect/commands.py.
from api import get_message, slack_api
from utils import block, verify
Finally, I also moved functionality for storing and retrieving
reflections into storage.py, which is where we'll do most of
the implementation work in this post.
Single function with dispatch
Adding storage is going to require changes
to event_post, reflect_post and recall_post.
In the current structure, that would require
deploying all three functions after each change, which
feels a bit overly complex.
To avoid that, I've shifted to use a single entry point,
named dispatch, and declaredf routes to identify
the correct handler for a given request.
def dispatch(request):
    signing_secret = os.environ['SLACK_SIGN_SECRET'].encode('utf-8')
    verify(request, signing_secret)

    # events are application/json, and
    # slash commands are sent as x-www-form-urlencoded
    route = "unknown"
    if request.content_type == 'application/json':
        parsed = request.json
        event_type = parsed['type']
        route = 'event/' + event_type
        if 'event' in parsed and 'type' in parsed['event']:
            route += '/' + parsed['event']['type']
    elif request.content_type == 'application/x-www-form-urlencoded':
        data = request.form
        route = 'command/' + data['command'].strip('/')

    for path, handler in ROUTES:
        if path == route:
            return handler(request)

    print("couldn't handle route(%s), json(%s), form(%s)" % \
          (route, request.json, request.form))
    raise Exception("couldn't handle route %s" % (route,))
We're then able to specify our various routes
within the ROUTES global variable.
ROUTES = (
    ('event/url_verification', url_verification_event),
    ('event/event_callback/app_home_opened', app_home_opened_event),
    ('event/event_callback/reaction_added', reaction_added_event),
    ('command/reflect', reflect_command),
    ('command/recall', recall_command),
)
If we want to add more routes in the future, we just add a route and a handler, no need to muck around within the Slack App admin, create a function or whatnot.
We do need to create the Cloud Function for dispatch though, so go ahead and create
it using the gcloud CLI.
gcloud functions deploy dispatch \
–env-vars-file env.yaml \
–runtime python37 \
–trigger-http
Then write down the new routing URL.
https://your-url-here.cloudfunctions.net/dispatch
Then I updated both /reflect and /recall Slash Commands to point to it in Slash Commands,
and also clicked over to Event Subscriptions and updated the Request URL.
With this cleanup complete, now we can shift into what we came here to do: adding storage.
Provisioning Firestore database
Since we're already deep in Google Cloud's tech stack for this project, we're going to use Google Firestore for our backend, largely following along the Firestore quickstart for servers.
First step is creating a new Firestore database.
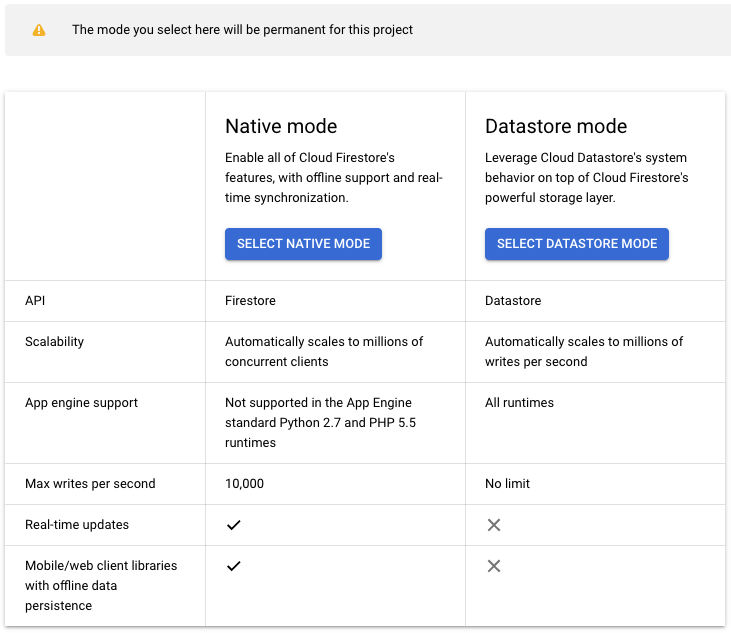
Select Native Mode, which is the newer version. The older version, Datastore mode, is being deprecated and has less functionality.
Next you'll need to select a region for your database, and whether you want a single-region database or a multi-region database. You want a multi-region database, although confirm that by reading the pricing page. The free tier is the same for both, and the price is just under twice as much for multi-region but still cheap.
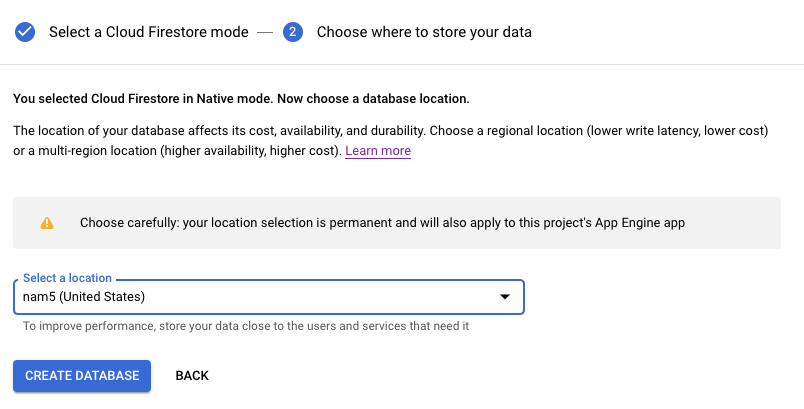
At this point your Firestore will start provisioning, which will take a couple of minutes.
Authentication credentials
Next we need to create authentication credentials to make requests to Firestore. First remind yourself of the project id for your project.
gcloud projects lists
Then create a service account.
gcloud iam service-accounts create reflectapp
gcloud projects add-iam-policy-binding reflectslackapp \
–member "serviceAccount:reflectapp@reflectslackapp.iam.gserviceaccount.com" \
–role "roles/owner"
Then generate keys.
This will create a JSON file with your credentials in
reflect/ as gcp_creds.json.
gcloud iam service-accounts keys create \
gcp_creds.json \
–iam-account reflectapp@reflectslackapp.iam.gserviceaccount.com
If you run the command in a different directory, move your gcp_creds.json
into reflect/.
Then we need to update reflect/env.yaml to point towards
the credentials file.
SLACK_SIGN_SECRET: your-secret
SLACK_BOT_TOKEN: your-bot-token
SLACK_OAUTH_TOKEN: your-oauth-token
GOOGLE_APPLICATION_CREDENTIALS: gcp_creds.json
With that, your credentials are good to go.
Add Python dependency
We'll need to add the Python library for Firestore
to our requirements.txt as well:
requests==2.20.0
google-cloud-firestore==1.6.0
You can install it into your local virtual environment via:
source ../venv/bin/activate
pip install google-cloud-firestore==1.6.0
Now we can start integrating with Firestore.
Modeling data in Firestore
Before we start our integration, a few words on the Firestore data model. From a distance, Firestore collections are similar to SQL tables, and Firestore documents are similar to SQL rows. Each document contains a series of key-value pairs, which can be strings, timestamps, numbers and so on.
However, these documents are considerably more capable than a typical rows,
and can contain sub-collections and nested objects.
Our data model is going to be a collection of users, with each user
having a subcollection of tasks, and each call to /reflect will create a new task.
Reading and writing to Firestore
Let's walk through performing the various operations we might be interested
in using the Python google.cloud.firestore library, starting with
creating a document.
Note that creating a document implicitly creates the containing collection,
no need to create it explicitly.
>>> from google.cloud import firestore
>>> db = firestore.Client()
>>> doc = db.collection('users').document('lethain')
>>> doc.set({'name': 'lethain', 'team': 'ttttt'})
update_time {
  seconds: 1573350318
  nanos: 108481000
}
You can also create a document without specifying the document id.
>>> col = db.collection('users')
>>> col.add({'name': 'lethain', 'team': 'ttttt'})
update_time {
  seconds: 1573370218
  nanos: 107401000
}
Retrieving an individual document.
>>> db.collection('users').document('lethain').get().to_dict()
{'team': 'ttttt', 'name': 'lethain'}
Retrieving all objects in a collection.
>>> for doc in db.collection('users').stream():
...     print(doc.to_dict())
...
{'name': 'another', 'team': 'ttttt'}
{'name': 'lethain', 'team': 'ttttt'}
Then let's take a stab at retrieving a subcollection, for example
all the tasks created by the user lethain.
>>> tasks = db.collection('users').document('lethain').collection('tasks')
>>> tasks.document('a').set({'name': 'a', 'text': 'I did a thing'})
update_time { seconds: 1573350799 nanos: 411757000 }
>>> tasks.document('b').set({'name': 'b', 'text': 'I did another thing'})
update_time { seconds: 1573350807 nanos: 355376000 }
>>> for doc in tasks.stream():
...     print(doc.to_dict())
...
{'name': 'a', 'text': 'I did a thing'}
{'text': 'I did another thing', 'name': 'b'}
What about filtering retrieval to a subset of documents?
>>> for task in tasks.where('name', '==', 'b').stream():
...     print(task.to_dict())
...
{'name': 'b', 'text': 'I did another thing'}
>>> for task in tasks.where('name', '==', 'c').stream():
...     print(task.to_dict())
...
>>>
We can use other operators, such as >=, <= and so on in our where clauses.
As we get into our actual implementation, we'll use the where clause filtering
on timestamps to retrieve only tasks in the last week by default, and dynamically
depending on user supplied parameters.
We can also order and limit the results.
>>> query = tasks.order_by('name', \
    direction=firestore.Query.DESCENDING).limit(5)
>>> for task in query.stream():
...     print(task.to_dict())
...
{'name': 'b', 'text': 'I did another thing'}
{'text': 'I did a thing', 'name': 'a'}
Deleting an object works about how you'd expect.
>>> db.collection('users').document('another').delete()
seconds: 1573351166
nanos: 188116000
Deleting all objects in a collection deletes the collection, with the weird caveat that deleting a document does not delete it's subcollections, so I could imagine it's easy to strand data this way.
Alright, we've put together enough examples here to actually implement our task storage and retrieval functionality and replace those long-standing stubs.
Implementing reflect
So far when users /reflect on a task, we're printing the data
into a log but otherwise ignoring it.
def reflect(team_id, user_id, text):
    print("Reflected(%s, %s): %s" % (team_id, user_id, text))
Now we can go ahead and replace that with something that works,
starting with a utility function to retrieve the tasks collection
for a given user within reflect/storage.py.
def tasks(team_id, user_id):
    key = "%s:%s" % (team_id, user_id)
    ref = DB.collection('users').document(key).collection('tasks')
    return ref
Then we'll use that collection to implement recall.
def reflect(team_id, user_id, text):
    doc = {
        'team': team_id,
        'user': user_id,
        'text': text,
        'ts': datetime.datetime.now(),
    }
    col = tasks(team_id, user_id)
    col.add(doc)
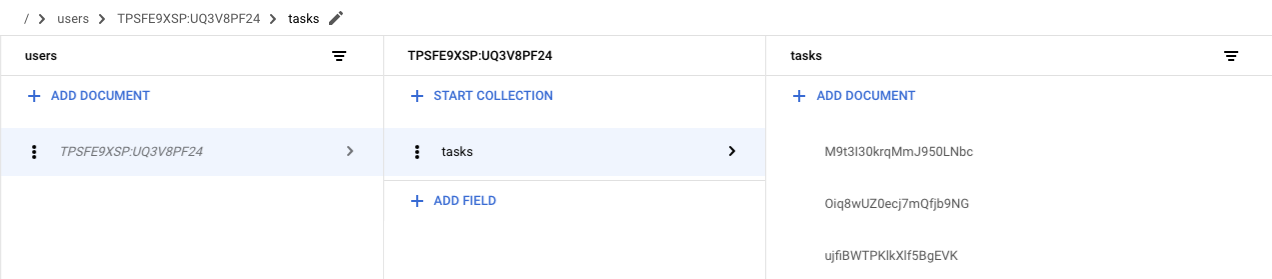
Deploy an updated version, and voila, your data is actually being stored. Add a new task in Slack.
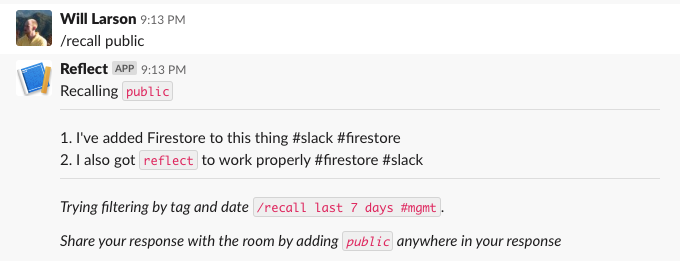
/reflect I've added Firestore to this thing #slack #firestore
Then we can verify within the Firestore data explorer.
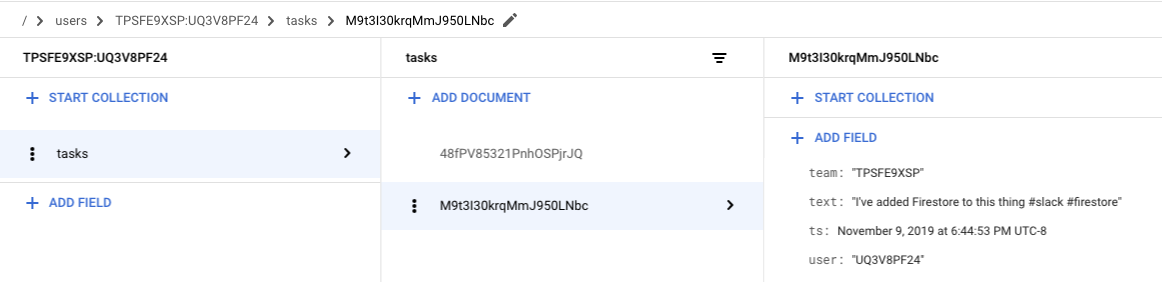
This is pretty great! Just a few lines of code and our Slack app is starting to do something real.
Implementing recall
Staying in reflect/storage.py, we'll use the same tasks function
to retrieve the collection of user tasks and then stream out the related
task documents.
def recall(team_id, user_id, text):
    col = tasks(team_id, user_id)
    for task in col.stream():
        yield task.to_dict()['text']
We could certainly imagine doing more to fully support
the implied query language in /recall documentation,
but I think we've done enough to demonstrate the scaffolding to
iterate into the real thing.
Deploy this updated /recall, and we can give it a try.
What about the reacji, do those work?
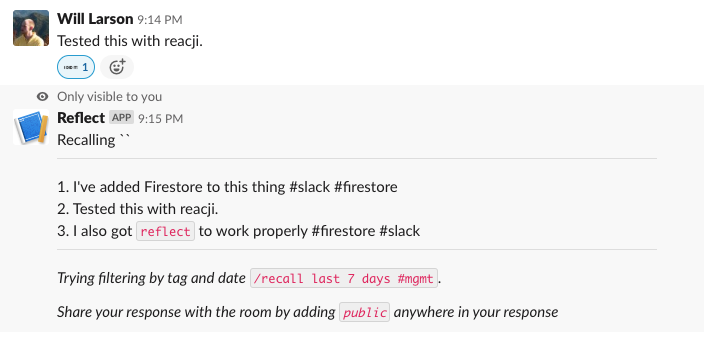
Yup, that works, then finally we just have to check in on the App Home and verify if that works too.
Yup, it looks like our app is truly working.
Thoughts on Cloud Firestore
This was my first chance to work with Cloud Firestore, and I came away quite excited by it. It's admittedly a fairly constrained set of query patterns, but after working with early versions of Cassandra I feel pretty comfortable modeling data within tight constraints.
Altogether, it started up quickly, was responsive, was expressive enough, and is quite cheap for this sort of small workload. Quite a lot to like.
I did find the Firestore documentation a bit scattered. What I was looking for was usually somewhere but not quite where I expected it, and I also ran into at least one page of documentation that directed to a 404, which was a bit surprising.
Next
We've come a long way. One post left, which will be focused on getting the app publishable so that other folks can install it!
continue in Distributing your Slack application
Distributing your Slack application.
We've been working on the reflect Slack application for a while,
and it's almost done. We just have to make
it possible for other folks to install it.
The golden standard of distribution is Slack's App Directory,
which makes it easy for folks to find and install your app.
We won't quite get our toy app into the App Directory, but we will make it possible for other folks to install it into their workspaces, at which point you could submit it to the directory if you wanted.
We've already done quite a bit, we just need to integrate with Slack's OAuth implementation to get workspace-scoped OAuth tokens and update our API requests to use those tokens instead of the hard-coded tokens we've used thus far. Hopefully this is easy...
post starts at commit 4584 and ends at commit 0fcc
Slack app in Python series
- Creating a Slack App in Python on GCP
- Adding App Home to Slack app in Python
- Make Slack app respond to reacji
- Using Cloud Firestore to power a Slack app
- Distributing your Slack application
Distributing Slack applications
To distribute a Slack app, there is a helpful checklist in the App admin. Google Functions are run over HTTPS, so we already have that covered. You might consider LetsEncrypt if you're using a different host and need free SSL.
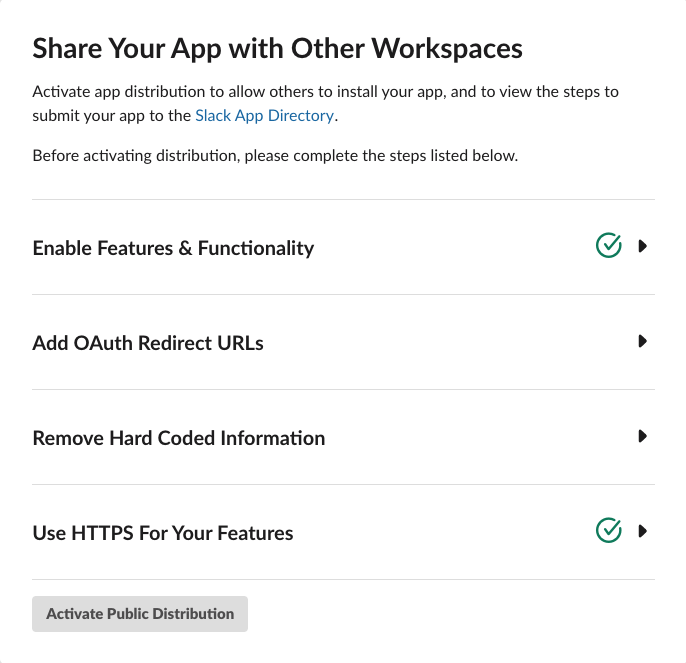
We've also already enabled quite a bit of functionality over the course of the series, starting with the Slash Commands, App Home, some Events, and so on. So we're good there too.
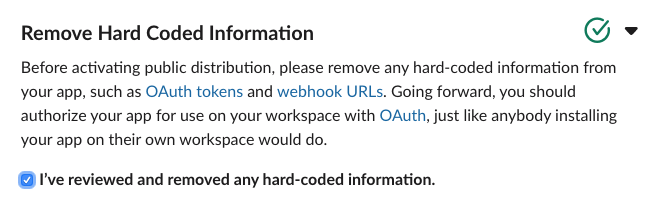
The remaining two are Add OAuth Redirect URLs, which we'll get into next,
and Remove Hard Coded Information. The later is just a checkbox asserting
that you've done it, but... we haven't done that yet since we have a bunch
of tokens in our env.yaml, so we'll come back to that after finishing the
OAuth flows.
Steps to integrate OAuth
To integrate with Slack's OAuth, we're going to need to:
- Implement an OAuth redirect URI that accepts the
codetoken from the OAuth flow and exchanges the token for long-lived OAuth tokens. - Register that new redirect URI with Slack.
- Store those long-lived tokens in Firestore so that we can retrieve the appropriate tokens based on the request's team.
- Use the team-appropriate tokens for API requests, no longer
using the tokens we've stored in
env.py. - Construct our authorization URL, which is where we'll redirect users in order for them to authenticate.
- Verify that our OAuth integration flow fully works.
- Update existing flows to use stored tokens.
There are a lot of details to keep straight here so it can get a bit confusing, but fortunately the actual code we need to write is on the simpler side. Onwards!
OAuth redirect URI
We're going to create a new Cloud Function that will handle
the redirect.
We'll start by updating reflect/storage.py to support
storing the retrieved tokens.
DB = firestore.Client()

def credentials(team_id):
    return DB.collection('creds').document(team_id)

def set_credentials(team_id, data):
    creds = credentials(team_id)
    creds.set(data)
I love that we can just shove the JSON response into Firestore without deconstructing it. Admittedly, we might want to be a bit more careful in validating the contents in a production application to guard against future changes to the data format.
Then we'll update reflect/api.py to support calling
oauth.access
which requires a slightly different format than the other two
API integrations we've done so far.
def oauth_access(code):
    url = "https://slack.com/api/oauth.access"
    client_id = os.environ['SLACK_CLIENT_ID'].encode('utf-8')
    client_secret = os.environ['SLACK_CLIENT_SECRET'].encode('utf-8')
    data = {
        'code': code,
    }
    auth = (client_id, client_secret)
    resp = requests.post(url, data=data, auth=auth)
    return resp.json()
Then we'll update reflect/main.py to add the new
function oauth_redirect which we'll turn into
a Cloud Function in a bit.
from api import oauth_access
from storage import set_credentials

def oauth_redirect(request):
    code = request.args.get('code')
    resp = oauth_access(code)
    team_id = resp['team_id']
    set_credentials(team_id, resp)
For this to work, we'll need to add SLACK_CLIENT_ID
and SLACK_CLIENT_SECRET to reflect/env.yaml.
Those values are in the Basic Information tab in
your App admin.
SLACK_CLIENT_ID: "your-client-id"
SLACK_CLIENT_SECRET: your-client-secret
SLACK_SIGN_SECRET: your-secret
SLACK_BOT_TOKEN: your-bot-token
SLACK_OAUTH_TOKEN: your-oauth-token
GOOGLE_APPLICATION_CREDENTIALS: ./gcp_creds.json
Note that you'll need to wrap your Client ID in quotes because otherwise Cloud Functions will attempt to treat it as a float, which will fail.
Then deploy our new Cloud Function so that we can get its URI.
cd reflect
gcloud functions deploy oauth_redirect \
–env-vars-file env.yaml \
–runtime python37 –trigger-http
Next up, registering the URL.
Register redirect URL
The URL we got when creating the oauth_redirect endpoint
will look something along the lines of this.
https://your-url.cloudfunctions.net/oauth_redirect
Now we need to go to the App admin, navigate to OAuth & Permissions on the left nav, and go to Redirect URLs.
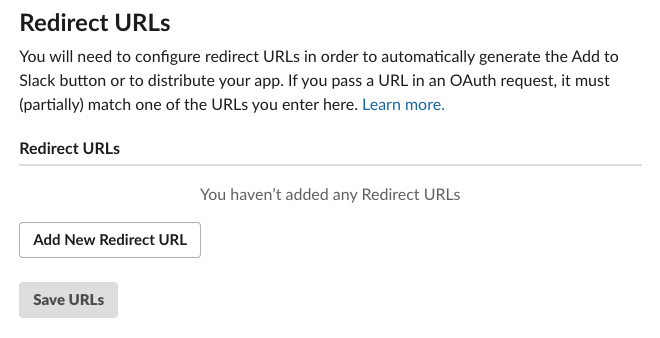
Click on Add Redirect URL, paste in the URL, and click Save URLs.
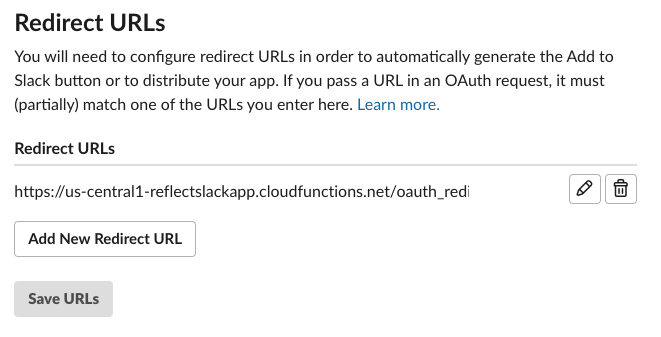
Excellent, we're one step further.
Create OAuth authorization URL
To authorize folks, we want to redirect them to
https://slack.com/oauth/authorize
We need to include two GET parameters: (1) client_id to identify our application,
and (2) scope of requested permissions required by our app.
There are additional parameters you can send, documented in Using OAuth 2.0,
but which we can ignore for now.
There is also a streamliend approached called Direct Install URL that is available for applications in the App Directory, which unfortunately is not us. Further, you can't get into the App Directory until you've integrated this OAuth flow, so there's no skipping these steps.
Let's start by constructing this URL by hand.
First we'll grab out client_id by going into our App admin,
selecting Basic Information on the left navigation, and scrolling
down to App Credentials.

In this case, our Client ID is 808524337907.822205476262.
Then in App admin we should go to OAuth & Permissions and note the four scopes we're using:
bot
commands
channels:history
reactions:read
Taking all of these, we can generate the authorization URL.
https://slack.com/oauth/authorize
?client_id=808524337907.822205476262
&scope=bot,commands,channels:history,reactions:read
Also note that you can get this generated for you by heading over to Manage Distribution in the App Admin now that you've added a Redirect URL (it doesn't show up until you've added one). It's pretty nifty, autogenerating an embeddable button for you, as well as the authorization link for your app with the correct scopes.
Verifying the flow
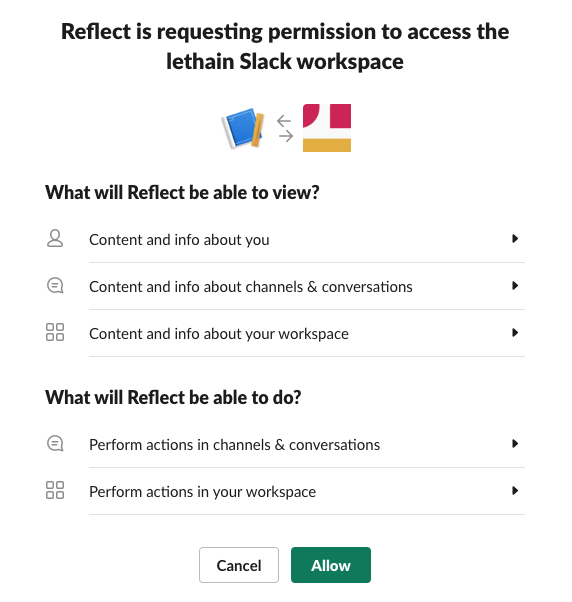
Now that we have our authorization URL, paste it into your browser and it's time to see if it actually works.
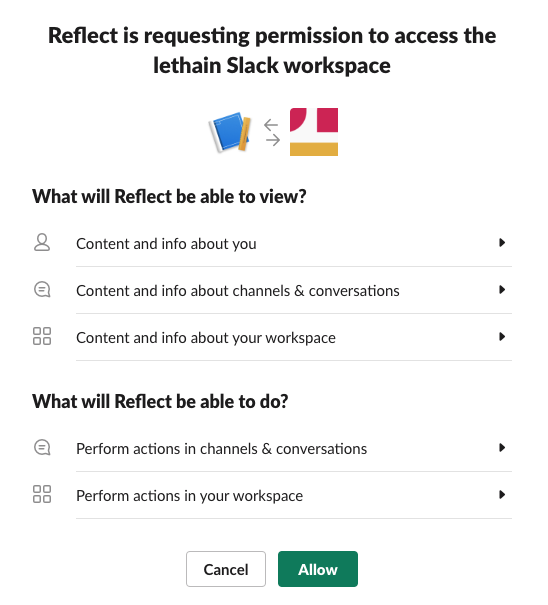
Click Allow and it'll redirect to our handler above, and then you'll see
a mostly white webpage with the text OK. Long term, you'll likely want
to redirect the user somewhere more helpful through a 301 response to
our oauth_redirect Cloud Function.
Slack recommends using their deep linking.
If we head over to Firestore, we can verify that we captured the data we want.
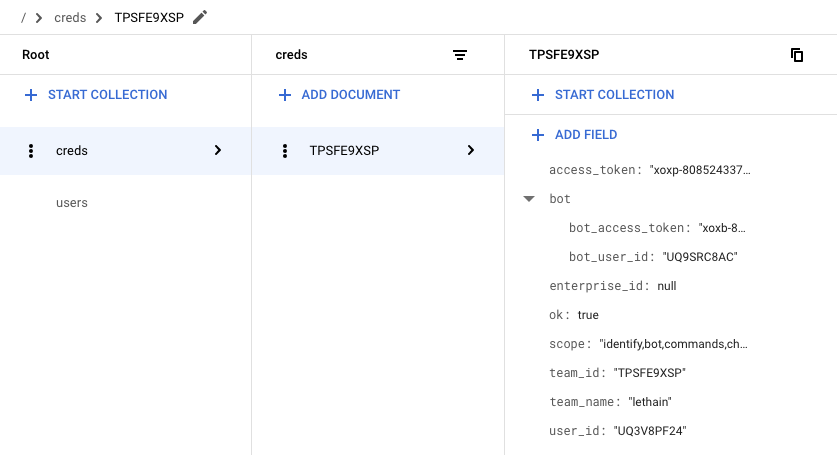
We did, which is quite exciting: we're almost done with our OAuth integration. We just need to update our calls into the Slack API to use these retrieve tokens instead of those we've previously hardcoded.
Using the tokens
We're capturing OAuth and bot tokens from the OAuth authorization flow,
so the first thing we should do is delete our hardcoded tokens in our
reflect/env.yaml file.
delete -> SLACK_BOT_TOKEN: your-bot-token     <- delete
delete -> SLACK_OAUTH_TOKEN: your-oauth-token <- delete
SLACK_CLIENT_ID: your-client-id
SLACK_CLIENT_SECRET: your-client-secret
SLACK_SIGN_SECRET: your-secret
GOOGLE_APPLICATION_CREDENTIALS: ./gcp_creds.json
Then we'll add a function to reflect/storage.py to
retrieve our credentials.
def get_credentials(team_id):
    creds = credentials(team_id).get().to_dict()
    return {
        'oauth': creds['access_token'],
        'bot': creds['bot']['bot_access_token'],
    }
Then we'll need to modify reflect/api.py to
grab credentials using get_credentials.
# retrieving bot token previously
os.environ['SLACK_BOT_TOKEN'].encode('utf-8')
# updated
get_credentials(team_id)['bot']

# retrieving oauth token previously
os.environ['SLACK_OAUTH_TOKEN'].encode('utf-8')
# updated
get_credentials(team_id)['oauth']
There is one minor caveat, which is that retrieving these
tokens requires threading the team_id into each of the function
calls that query the Slack API. This requires refactoring
reflect/events.py a bit. Fortunately team_id
is included in all the events that we're subscribed to,
making it easy to thread through.
Afterwards, deploy the latest version of dispatch,
and it should work. Verify by testing our /reflect,
/recall, visting the App Home, and using a reacji.
Enabling distribution
Assuming everything above worked, then head back to Manage Distribution, scroll down to Remove Hard Coded Information, and confirm that you have.
At which point the Activate Public Distribution button will enable, which you should click.
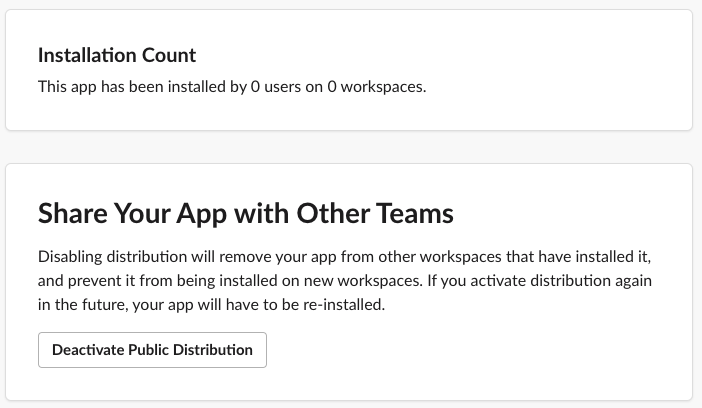
After enabling distribution for your app, you're able to see your installation count, disable distribution, as well as enter a workflow to submit your application to the Slack App Directory, most importantly though: if you share the authorization URL with someone, they can install your app.
Another way to say this is: we're done!
Some reflections
Over the course of these five entries, I've gotten to spend a good amount of time with both Slack's API and Google's function-as-a-service offering, Cloud Functions. Both were moderately delightful.
Slack
I started this series with the hypothesis that building an application on Slack's platform would be easier than building a comparable web application. At the end, I think that hypothesis held true for this project. Starting up new projects requires a tremendous amount of scaffolding, and Slack has done a phenomenal job of providing quick-to-implement interfaces that absolve you from writing scaffolding, even if you eschew their Python SDK and write raw integrations, which I did to learn more about the underlying APIs.
You could argue that SDKs are the real interface for modern APIs, because the vast majority of integrations go through language specific SDKs rather than generating raw API calls, but I'll leave that argument for a different post.
Slash Commands are very comfortable for me with a text-based past, and I'm curious if others are equally comfortable with them or if there is something of an split between folks who grew up using IRC and folks who did not. I do think there's a clear argument for Reacji as modernized Slash Commands with better discoverability.
Overall I think reacji-as-user-interface is a particularly fun and interesting
area to explore in Slack applications, and I imagine Slack has some pretty powerful
data on usage patterns. One nit is that I wish I could filter incoming reaction events
based on the specific reactions, e.g. only get events for the :ididit: reaction
instead of having to filter out all of them. The volume of irrelevant reactions is
so much higher than the volume of reactions any given app would care about, and
skipping out on that network traffic seems ideal.
The two areas where the Slack API and platform feel most like a work-in-progress are (1) constrained expressivity and (2) API inconsistency.
When I started formatting the list of completed tasks, I ran into an interesting
problem: neither Block Kit nor mrkdwn support lists. Instead you can create a sort
of raw Markdown-ish list by shoving each item into its own paragraph, but it's not quite
right, and it's even further from a Dropbox Paper-esque
dynamic, shared checklist. Often genius comes from constraints,
and Slack's constraints in expression are driving innovation like reacji,
but it remains true that a web or native application has a stagger amount of flexibility
to express its ideas, and today Slack apps do not.
It's the natural state of long-lived platforms to end up with some inconsistency in their APIs, and Slack shows a fair amount of their evolution in their API. It's also the case that the consistency of their API design is constrained by the inconsistencies in web standards: Slack can't make the OAuth flows consistent with their Events API, because the OAuth flows are an aging standard they must adhere to. This essential inconsistency required by implementing web-standards while also offering modern API behavior is a real challenge, and SDKs are really the only path around it, which Slack is certainly doing.
Overall, I think the completeness of the Slack platform and ease of building on it is quite exciting, and I can only imagine where it'll be in a few more years.
GCP
Developing on Cloud Function was the lowest overhead project scaffolding
I've experienced, allowing me to get started almost instantly.
Running Python servers is particularly annoying–I've spent enough time configuring
uWSGI, thanks–and I got to skip all of that and just write the application-specific code.
Adding requirements.txt dependencies worked as expected, copying files in directory for extra data
worked as expected, being able to pass in environment variables worked well, etc.
Cloud Firestore was also surprisingly easy to set up and use. The query patterns are very constrained, but as a document store that takes no administrative overhead to setup, it just worked for this usecase. I have so many toy projects that I never operationalize because dealing with storage is a pain or expensive, and I think many of those projects might be going into Firestore in the future.
The biggest gap in Cloud Functions as they stand today is that it's surprisingly hard to put them behind a load balancer without writing your own software, which is straightforward on AWS. This might not be necessary for autoscaling purposes as the function scheduler is an orchestration system in its own right, but it is necessary in terms of getting behind a single SSL connection, being able to multiplex requests across multiple resources on one HTTP/2 connection, presenting a professional veneur of running behind your own domain, and to have a clean interface behind which you could shift your implementation over time.
Altogether, I really enjoyed this project and particularly it reminded me how joyful it is to write small-scale software in Python. I hope these notes are useful to someone, and drop me a note with your thoughts.
That's all for now! Hope to hear your thoughts on Twitter at @lethain!
|